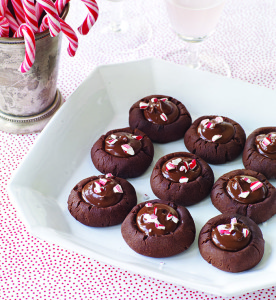
These two-bite cookies pack just the right amount of chocolaty richness and minty freshness to cure whatever ails you. With their natural cocoa powder, buttery bittersweet chocolate, and a dash of crunchy peppermint candy, they are the perfect triple-threat treat to satisfy a chocolate-loving crowd.
When it comes to delivering deep, dark chocolate flavor, plain old cocoa powder is hard to beat. For baking, I like to use natural cocoa because it delivers a stronger flavor. For garnishing desserts, like truffles, I prefer Dutch-processed cocoa, as it has a mellower, less acidic flavor.
—Abigail Johnson Dodge
Recipe by Abigial Johnson Dodge from The Everyday Baker, published by The Taunton Press, 2015.
• ON-DEMAND: Listen to Faith and Abby talk about this cookie (as well as others from the book.) •
Read our review of the book and get recipes for Abby’s Hazelnut-Raspberry Sandwich Cookie Wreaths and Rosemary Cornmeal Shortbread.

- 1/3 cup (2 oz./57 g) chopped bittersweet chocolate
- 3 Tbs. (1-1⁄2 oz./42 g unsalted butter, cut into 4 pieces
- 1/3 cup (1-5/8 oz./46g) chopped peppermint hard candies
- Put the chocolate and butter in a small heatproof bowl and melt in the microwave or over a pan of simmering water, stirring until smooth. (This can also be done in the microwave.) Remove from the heat and set aside until cool and slightly thickened.
- Arrange the cooled cookies on a cookie sheet or sheet pan. Using a small spoon, drizzle the thickened and cooled chocolate into each indentation, filling just to the rim but not to overflowing. Alternatively, scrape the chocolate into one corner of a small zip-top plastic bag, press out the air, and seal. Cut off a small piece of the corner and pipe the chocolate into the indentations. Set the cookies aside until the chocolate filling is set but still tacky to the touch, about 10 minutes. Sprinkle the tops with the chopped peppermint candies. Let cool completely before stowing or serving.
Flavor swap
Chocolate–caramel: Omit the peppermint extract from the cookie dough and bake as directed. Instead
of the chocolate filling use quick caramel filling (see below). Replace the crushed peppermint candy topping with toasted, chopped nuts.
Caramel Filling
11 small (6 oz.) caramels (I use Kraft® brand), unwrapped
3 Tbs. heavy cream
In a small saucepan, combine the caramels and heavy cream. Set the pan over very low heat and cook, stirring constantly, until the caramels have melted and the mixture is smooth, about 2 minutes. (This can also be done in the microwave.)
Cover and refrigerate leftovers.
Make Ahead
The cookies can be baked and cooled, then layered between sheets of parchment or waxed paper in an airtight container and stowed at room temperature for up to 5 days or frozen for up to 3 months before thawing at room temperature and filling.
The chocolate filling can be prepared and refrigerated for up to 2 weeks. Gently reheat in the microwave or on top of the stove and fill the cookies while the chocolate is still warm.
The filled cookies can be stowed at room temperature for up to 3 days. To keep the cookies looking their best, arrange them on a half sheet pan in a single layer and cover the pan tightly (avoiding the cookie tops) with plastic.
Shaping the dough and forming the indentation
Scoop the dough with a 1-Tbs. mini scoop, then release it into your hand.
Form the dough into a smooth ball, rolling it between the palms of both hands (there’s no need to flour your hands).
Once all the dough balls have been rolled, use a 1⁄2-tsp. measure to press down gently into the center of the ball, going almost to the bottom. Dip the measure in flour if it starts to stick to the dough.
If big cracks form as you press into the dough ball, reroll the dough and start again.